

Fingerprint mobile
Downloading the SDK
If you haven't downloaded the iOS or Android SDK yet, you should do so before continuing. To do this, access one of the links according to what you need.
About the integration
Add the Iovation Mobile SDK to your applications to collect information about the shoppers' devices. A black box will be generated containing all available device information.
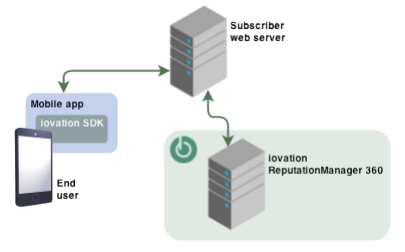
Integrating with iOS applications
iOS integration files and requirements
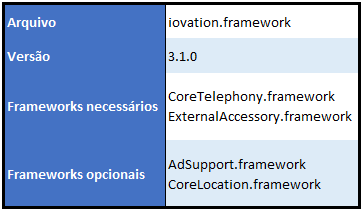
This version supports iOS 5.1.1 or higher on the following devices:
- iPhone 3GS and later
- iPod Touch 3rd generation or later
- All iPads
Installing the SDK on iOS
-
Download and unzip the SDK;
-
In Xcode, drag iovation.framework into your project's navigation area
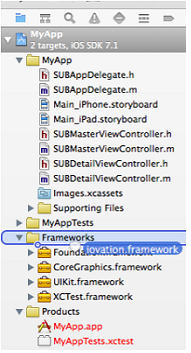
-
In the dialog box that appears:
-
Select Copy items if needed to copy the framework to the project directory
-
Check the checkbox for the targets in which you plan to use the framework
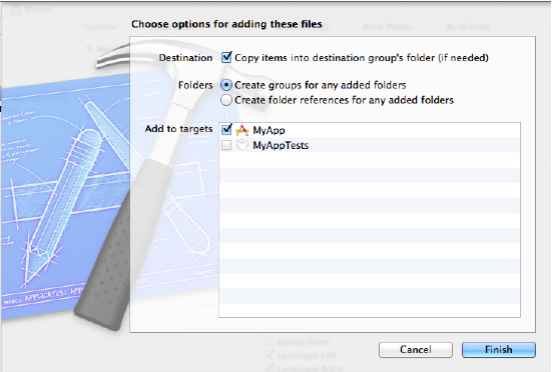
-
Click Finish
-
Add the following frameworks to the application target in XCode:
ExternalAccessory.framework. If you verify that Wireless Accessory Configuration is enabled in Xcode 6 or higher and you don't need it, disable it and add ExternalAccessory.framework again
CoreTelephony.framework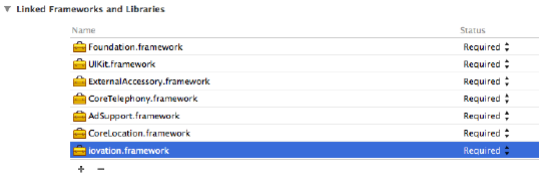
-
Optionally, add these frameworks if your application makes use of them:
AdSupport.framework. If your application displays ads
Note: Do not include if your application does not use ads, as the App Store rejects applications that include the framework but do not use ads
CoreLocation.framework. If your application uses local monitoring
Note: Do not include unless your application requests geolocation permission from the user
Using the +ioBegin function
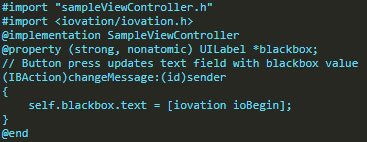
The +ioBegin function collects information about the device and generates a black box. This black box must be sent through the Customer.BrowserFingerPrint field along with the other data for analysis.
Syntax
NSSstring * bbox = ation ioBegin]
**
Return values
bbox - string containing the black box
WarningThe black box returned by +ioBegin must never be empty. An empty black box indicates that the protection offered by the system may have been compromised.
Example
Integrating with Android applications
Android integration files and requirements
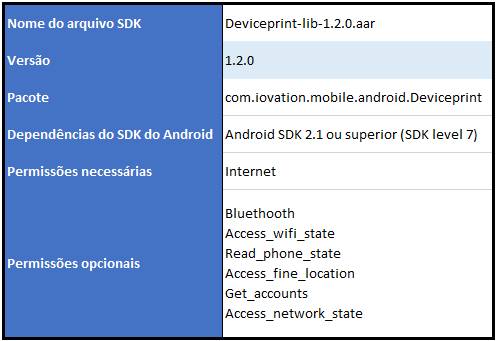
ImportantIf the listed permissions are not required by the application, the values obtained using these permissions will be ignored. The permissions are not required to obtain a black box, but they help obtain more device information.
Version 1.2.0 of the Iovation Mobile SDK for Android supports Android versions 2.1 or higher.
Installing the SDK on Android
- Download and unzip deviceprint-lib-1.2.0.aar;
- Start the IDE of your choice;
- In Eclipse and Maven, deploy the .aar extension file to the local Maven repository, using maven-deploy. More details at: Maven Guide;
- In Android Studio, select File -> New Module. Expand More Modules and choose Import existing .jar or .aar package;
- Select the deviceprint-lib-1.2.0.aar file, and click Finish;
- Make sure device-lib is a compile dependency in the build.gradle file.

Using the ioBegin function
The ioBegin function collects information about the device and generates a black box. This black box must be sent through the Customer.BrowserFingerPrint field along with the other data for analysis.
*Syntax
public static String ioBegin(Context context)
*Parameters
context - an instance of the android.content.Context class used to access information about the device
Return values
string containing the black box
Important
- The black box returned by ioBegin must never be empty. An empty black box that only contains 0500 indicates that the protection offered by the system may have been compromised;
- The device-lib-1.2.0.aar file must be packaged with the application;
- Building the sample application in Android Studio;
- If the option to run the module doesn't appear, select File -> Project Structure and open the Modules panel. From there, set the Android SDK version in the list.
-
Download and unzip deviceprint-lib-1.2.0.aar;
-
In Android Studio, select File -> Open or click Open Project through the quick-start option;
-
In the directory where you unzipped deviceprint-lib-1.2.0.aar, open the sample application's android-studio-sample-app directory;
-
Open the DevicePrintSampleActivity file;
-
With some configurations, Android Studio may detect an Android Framework in the project and not configure it. In this case, open the Event Log and click Configure;
-
A pop-up will open for you to select the Android Framework. Click OK to fix the errors;
-
In Android Studio, select File -> New Module. Expand More Modules and choose Import existing .jar or .aar package;
-
Select the deviceprint-lib-1.2.0.aar file, and click Finish;
-
Make sure device-lib is a compile dependency in the build.gradle file;

-
Open the DevicePrintSampleActivity folder;
-
In the project navigation option, open src/main/java/com/iovation/mobile/android/sample/DevicePrintSampleActivity.java;
-
Right-click and select Run DevicePrintSampleAct;
-
Select a connected physical device or a virtual Android device to run the application;
-
The application will build and run.
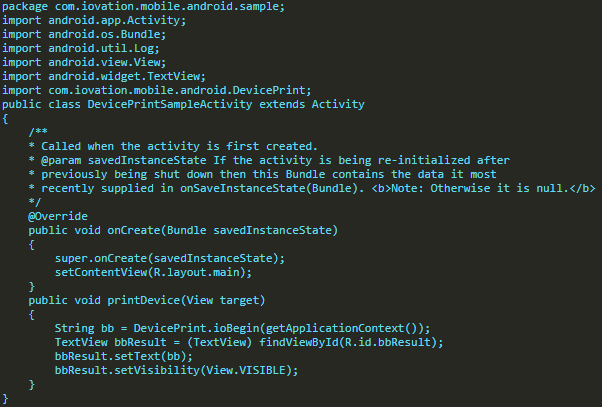
The example is simple: there is a button, and when clicked, a text box is filled in with the black box. For a richer example, see the Android Studio sample application included in the SDK.
Updated 19 days ago